Group Management
In this window, you can view, set up, and manage groups within Neptune® 360™. Groups allow you to categorize endpoints for focused and comparative water usage analysis. For example, you can create a group for all the restaurants within your system to compare water usage and then filter Neptune 360 reporting views to only include these endpoints.
Groups help you organize endpoints into meaningful cohorts so you can quickly filter dashboards, reports, and exports for targeted analysis. For example, utilities often create groups for restaurants, schools, or irrigation accounts to monitor consumption patterns, identify leaks, and manage seasonal usage. Critical facilities, like hospitals, can be grouped for priority alerts, while delinquent accounts or multi-unit properties are grouped to streamline billing and soft disconnect workflows. You can also group by meter size or classification to support asset audits, deployment phases, or replacement programs, making investigations and reporting faster and more focused.

What You Can See and Do in This Window
Click a link to display the related information or step-by-step procedure. Note that you may have access only to certain functions based on your role.
| – | |
| – | |
| – | |
| – |
View Groups
When you access the Groups window, a list of groups that are set up displays and each group shows the number of endpoints (meters / endpoints) assigned to the group and the date of the last update for the group. When you click a group, the list of endpoints within the group is displayed in the right panel along with the Group Description.
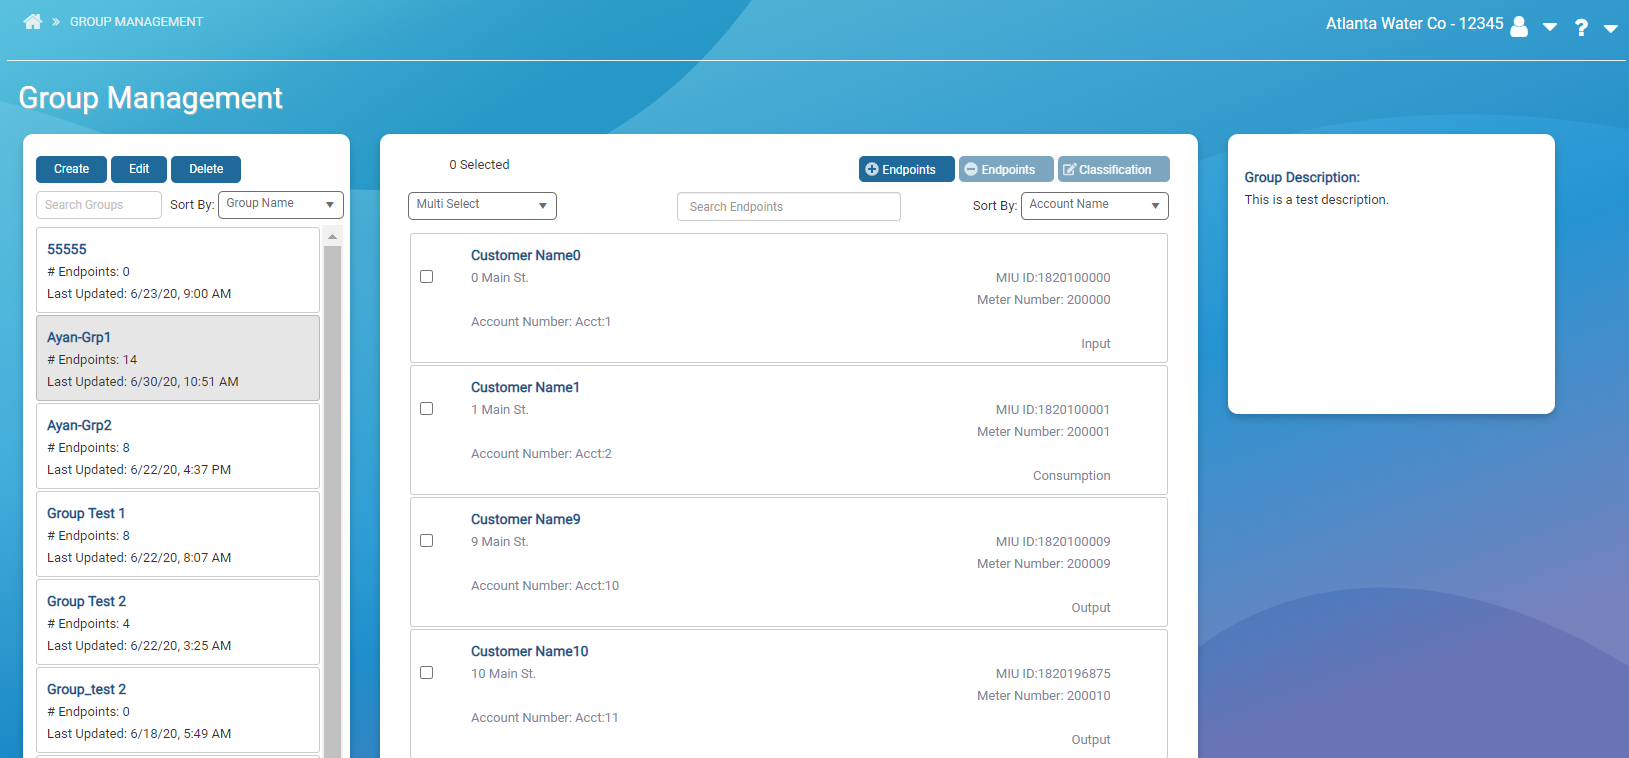
Endpoint-specific information includes:
- Account Name.
- Account Number.
- Address.
- Endpoint (MIU) ID.
- Meter Number.
- Meter Size.
- Endpoint Classification.
The bottom of the window displays navigation options for groups with an extensive list of endpoints.
Search and Sort Groups
You can search for a specific group by name, or sort by group name, number of endpoints in the group, or by the last update to the group.
- On the Neptune 360 navigation panel, select Group Management under Groups.
- Click the arrow in the Sort by field, and then select an option:
- Group Name – is the default and sorts in ascending order.
- # of Endpoints – sorts in ascending order.
- Last Updated – sorts in descending order, with the most recently updated first.
- In the Search Groups field, type the first few characters of the group name to filter the list.
- Click any group to display the endpoints and group description in the right panels of the window.
Delete a Group
Deleting a group removes it from Neptune 360. If you delete a group in error, you can create it in the system again.
- On the Neptune 360 navigation panel, select Group Management under Groups.
- If the group does not display in the left panel, then in the Search Groups field, type the first few characters of the group name to display matching groups, or scroll through the list to find it.
- Select the group you want to delete, and then click Delete.
- In the confirmation dialog box, click Delete.
Search and Sort Group Endpoints
You can search for any endpoint within the selected group, or you can sort to customize your endpoint list. The search function enables you to search on just a few characters that appear anywhere in most endpoint details (Account Name, Account Number, Address, Endpoint (MIU) ID, Meter Number).
You can sort endpoints by the details defined for the endpoints.
- On the Neptune 360 navigation panel, select Group Management under Groups.
- Click the arrow in the Sort By field, and then select an option:
- Account Name
- Account Number.
- Address.
- Endpoint (MIU) ID.
- Meter Number.
- Meter Size.
- Classification.
Account Name is the default and all options will sort in ascending order.
- In the Search Endpoints field, type one or more characters that appear in the endpoint details.
The list of endpoints that match the search criteria is displayed.
- To reset the search results, delete the search criteria from the Search Endpoints field.
See Search Endpoints - Advanced for the steps to perform a more detailed searched.
Select Group Endpoints
The Endpoints panel offers selection options for easy endpoint selection, especially if there are a significant number of endpoints within your network. You can click the box next to one or more individual endpoints to select just a few, or use the Multi Select option to select endpoints in greater numbers.
- On the Neptune 360 navigation panel, select Group Management under Groups.
- In the Multi Select field, click the down arrow, and then select one of the following:
- Select All – selects every endpoint within the selected group.
- Select Page – selects every endpoint on the page. Each page contains a maximum of 10 endpoints.
- Deselect All – unselects all previously selected endpoints.
Sort Endpoints
You can sort endpoints by the details defined for the endpoints:
- Account Name.
- Account Number.
- Address.
- Endpoint (MIU) ID.
- Meter Number.
- Meter Size.
- Classification.
- On the Neptune 360 navigation panel, select Group Management under Groups.
- In the Sort by field, select the sort option.
The system sorts the list in ascending order.
Change an Endpoint Classification
Classifications aid in District Metering analysis. You can change the classification of an endpoint after you add it to a group using any of the following options:
- Consumption (default)
- Input
- Non-consumption
- Output
You can classify the same endpoint differently in different groups. For example, you can classify an endpoint as a Consumption meter in one district and an Input meter in another district.
- On the Neptune 360 navigation panel, select Group Management under Groups.
- On the right panel, select one or more endpoints for which you want to change the classification.
- Click Classification.
- In the Choose Classification dialog box, select the classification to assign the endpoints, and then click OK.
Remove an Endpoint from a Group
You can remove an endpoint from a group. If you remove an endpoint in error, you can add it back later.
- On the Neptune 360 navigation panel, select Group Management under Groups.
- On the left panel, select the group from which you want to remove an endpoint.
- On the center panel, select one or more endpoints to remove, and then click
 .
. - In the confirmation dialog box, click Delete.
